
diff options
Diffstat (limited to '')
| -rw-r--r-- | 02.-Direction-Finding-Quickstart-Guide.md | 2 | ||||
| -rw-r--r-- | 05.-KrakenSDR-Web-Interface-Controls.md | 2 | ||||
| -rw-r--r-- | 07.-KrakenSDR-Troubleshooting.md | 19 | ||||
| -rw-r--r-- | 11.-Kraken-Pro-Cloud-Mapper.md | 171 | ||||
| -rw-r--r-- | 12.-Appendix.md | 64 |
5 files changed, 202 insertions, 56 deletions
diff --git a/02.-Direction-Finding-Quickstart-Guide.md b/02.-Direction-Finding-Quickstart-Guide.md index 794da21..5dc26bc 100644 --- a/02.-Direction-Finding-Quickstart-Guide.md +++ b/02.-Direction-Finding-Quickstart-Guide.md @@ -54,7 +54,7 @@ The image below explains how the antennas should be mounted. Make sure the array The next step is to burn the KrakenSDR Direction Finding (DF) image to an SD Card. For the Pi 4 image you will need an 8GB or larger card, and for the Pi5 and OPI5B images you will need a 16GB or larger card. We also recommend using class 10 or faster to ensure no file system slowdowns. -1. Using a PC, download the “Etcher” software from [balena.io/etcher](https://www.balena.io/etcher/). +1. Using a PC, download the “Etcher” software from [balena.io/etcher](https://www.balena.io/etcher/). NOTE: Do not use the Raspberry Pi imager software to burn the SD card, and do not customize the login details, as the code relies on the username being kept as the default "krakenrf". 2. Download the latest KrakenSDR image zip file for your Pi 4, Pi 5 or Orange Pi 5B from the SD card folder linked above. 3. Use [Balena Etcher](https://www.balena.io/etcher/) to burn the image onto the SD Card. Using Etcher you can burn directly from the ZIP file. (There was a report that Etcher does not properly work on MacOS, MacOS users can try [Raspberry Pi's Imager](https://www.raspberrypi.com/software) instead) 4. Insert the card into your Raspberry Pi 4. diff --git a/05.-KrakenSDR-Web-Interface-Controls.md b/05.-KrakenSDR-Web-Interface-Controls.md index e7aeb24..781adcc 100644 --- a/05.-KrakenSDR-Web-Interface-Controls.md +++ b/05.-KrakenSDR-Web-Interface-Controls.md @@ -323,7 +323,7 @@ This provides an option to calibrate the full system by compensating for phase d `explicit-time-delay` - If you've measure time delay with a VNA you can input the time differences in nanoseconds here. Please note the differences must be measured relative to channel 0. -`touchtone` - You can output .s1p files from your VNA for the 5 coax cables in your system, and copy them to the _calibration folder. Name them as cable_ch0.s1p, cable_ch1.s1p and so on for each of your five cables used in the system. You need to ensure that the touchstone file covers the frequency range that you will be using. +`touchtone` - You can output S21 or S12 .s1p files from your VNA for the 5 coax cables in your system, and copy them to the _calibration folder. Name them as cable_ch0.s1p, cable_ch1.s1p and so on for each of your five cables used in the system. You need to ensure that the touchstone file covers the frequency range that you will be using. Note that this will only work as long as the phase compensation does not wrap - e.g. make sure that the cables you are calibrating have length differences much less than the frequency wavelength you are working with. **IQ Adjust Amplitude** diff --git a/07.-KrakenSDR-Troubleshooting.md b/07.-KrakenSDR-Troubleshooting.md index a80d137..5e6d223 100644 --- a/07.-KrakenSDR-Troubleshooting.md +++ b/07.-KrakenSDR-Troubleshooting.md @@ -43,7 +43,11 @@ Alternatively, just connect an HDMI screen and keyboard, and the terminal will a ### View and Enable Logging If you have installed the software from scratch, and suspect some issue with missing packages or similar you can enable error logging to try and diagnose the problem. Edit the daq_chain_config.ini text file with `nano ~/krakensdr_doa/heimdall_daq_fw/Firmware/daq_chain_config.ini`, and change `log_level = 2`. Log files will be written to `krakensdr_doa/heimdall_daq_fw/Firmware/logs`. -Also, you can enable logging on the DOA DSP software by editing the settings.json text file `nano ~/krakensdr_doa/krakensdr_doa/settings.json` and setting `logging_level = 2`. The DOA DSP logs will be written to `~/krakensdr_doa/krakensdr_doa/ui.log`. +Also, you can enable logging on the DOA DSP software by editing the settings.json text file `nano ~/krakensdr_doa/krakensdr_doa/settings.json` and setting `logging_level = 2`. + +The DOA DSP logs will be written to `~/krakensdr_doa/krakensdr_doa/_share/logs/krakensdr_doa/ui.log`. + +The Heimdall DAQ log files will be written to `~/krakensdr_doa/heimdall_daq_fw/Firmware/_logs` Remember to turn logging off again by setting the logging levels to 5 after the issue is fixed, to avoid a large log file growing on the SD card. @@ -52,6 +56,12 @@ Here we will confirm that all the tuners in the KrakenSDR system are seen by the Connect an HDMI monitor and keyboard, or SSH into the terminal as shown above. +If you are using one of our ready-to-use images, be sure to stop the KrakenSDR software first by running the following commands. + +``` +cd krakensdr_doa +./kraken_doa_stop.sh +``` In a terminal window run “kraken_test -d0” (NOTE: Older image files will use "rtl_test -d0"). You should see a message like the following. ``` @@ -82,6 +92,13 @@ If all the tuners showed similar messages, then we have confirmed that all the t ## Power Supply Test Remember that the KrakenSDR **must** be powered with a 5V/2.4A+ capable external power supply. No power is provided over the USB data port. +If you are using one of our ready-to-use images, be sure to stop the KrakenSDR software first by running the following commands. + +``` +cd krakensdr_doa +./kraken_doa_stop.sh +``` + Open four terminals, and in each individual terminal run kraken_test for an individual tuner. (NOTE: In older images use rtl_test instead of kraken_test if kraken_test is missing) `kraken_test -d0` diff --git a/11.-Kraken-Pro-Cloud-Mapper.md b/11.-Kraken-Pro-Cloud-Mapper.md index 87abb9c..4ef3f8c 100644 --- a/11.-Kraken-Pro-Cloud-Mapper.md +++ b/11.-Kraken-Pro-Cloud-Mapper.md @@ -1,12 +1,18 @@ -# Kraken Pro Cloud Alpha Note +# Kraken Pro Cloud BETA Status -This software is in ALPHA status. That means that all the intended features are not yet implemented, and that it may have multiple bugs. We also do not guarantee any uptime for this service at this time. +This software is in BETA status. That means that it may have multiple bugs. We also do not guarantee any uptime for the service at this time. The server could crash and go offline for several hours to days at a time in the worst case. The server could lag if many people are using it. -**Before starting, please ensure you are on the latest code or on the latest Pi 4 Image file.** +**Before starting, please ensure you are on the latest code or on the latest image file for the Pi 4, Pi 5, Orange Pi 5 or Virtual Box.** + +# Kraken Pro Cloud Features and Pricing + +Currently, Kraken Pro Cloud and all its features are offered free of charge. However, we do intend on eventually moving towards a 'freemium' based model, where the basic features remain free, but advanced features such as history require an (affordable) subscription service. This is to help offset our development and server running costs. + +We may also consider offering the server software itself as something that can be purchased, for people who wish to run their own private cloud mapper servers. If you wish to express your interest in this please email us at thekraken@krakenrf.com. # Kraken Pro Cloud -[Kraken Pro Cloud](https://map.krakenrf.com) is our online cloud mapping solution for KrakenSDR devices. It allows you to upload KrakenSDR direction finding data onto our central server, so that you can combine bearing data from multiple geographically distributed KrakenSDR devices. With the right geography of the receivers and transmitter, this allows you to instantly determine the location of a transmitter without needing to take multiple readings with a vehicle. +[Kraken Pro Cloud (map.krakenrf.com](https://map.krakenrf.com) is our online cloud mapping solution for KrakenSDR devices. It allows you to upload KrakenSDR direction finding data onto our central server, so that you can combine bearing data from multiple geographically distributed KrakenSDR devices. With the right geography of the receivers and transmitter, this allows you to instantly determine the location of a transmitter without needing to take multiple readings with a vehicle. 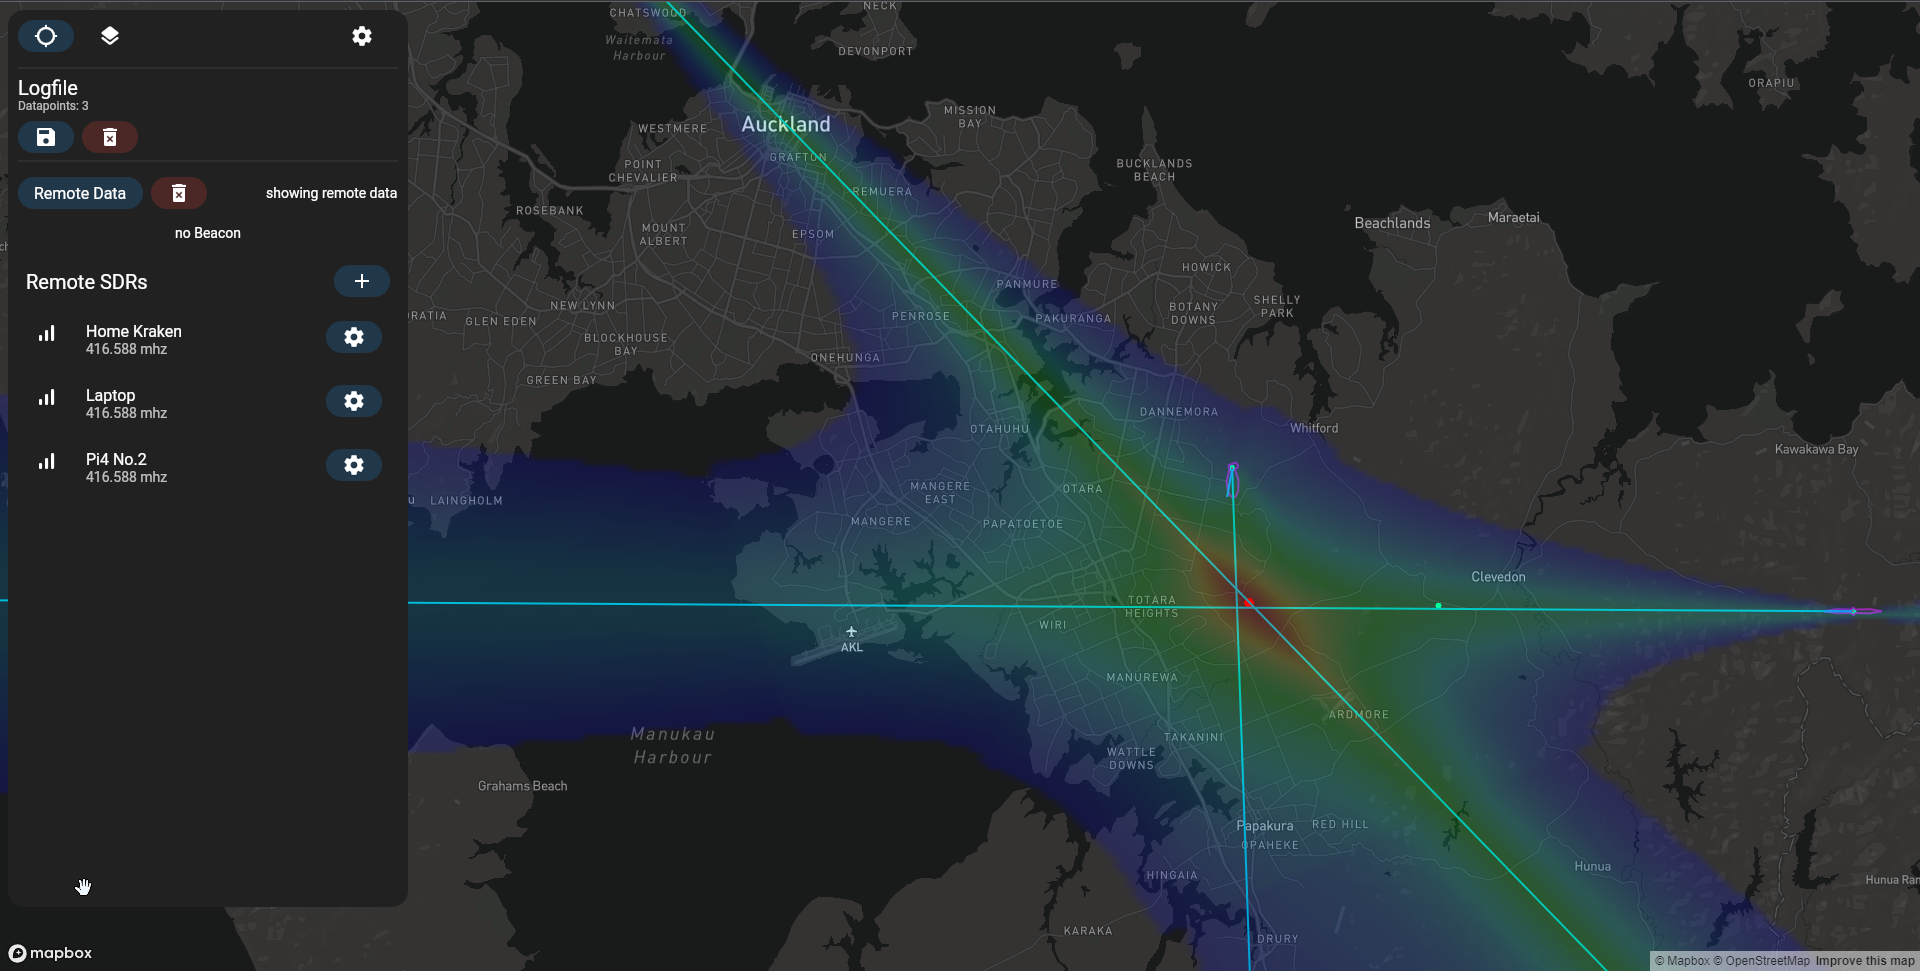 @@ -16,9 +22,9 @@ At least two and ideally three or more KrakenSDRs spread out over some distance # Software Usage -Kraken Pro Cloud can be accessed by browsing to https://map.krakenrf.com. In order to sign up you will need to enter your email address, and have the serial number of any KrakenSDR that you own. This is the 8-digit number printed under the CE/FCC/UKCA/NoBinning logos on the front-right of the device. +Kraken Pro Cloud can be accessed by browsing to https://map.krakenrf.com. To sign up you will need to enter your email address and have the serial number of any KrakenSDR that you own. This is the 8 to 12-digit number printed under the CE/FCC/UKCA/NoBinning logos on the front-right of the device. -**KerberosSDR Owners:** KerberosSDR owners are also welcome to use this software. However as the KerberosSDR does not have a serial number, please email us at thekraken@krakenrf.com with proof of ownership details. Be it a photo of the KerberosSDR with the current date, or an invoice. We will generate a serial number for you. +**KerberosSDR Owners:** KerberosSDR owners are also welcome to use this software. However as the KerberosSDR does not have a serial number, please email us at thekraken@krakenrf.com with proof of purchase details. We will then generate a serial number for you. Once logged in your will be presented with a map and control sidebar. @@ -26,102 +32,163 @@ Once logged in your will be presented with a map and control sidebar. ### Create a Remote SDR Station -To use the live bearing plotting features of the software you will need to add your KrakenSDR as a 'Remote SDR'. To do this, click on the `+` icon next to the Remote SDRs text. +To use the live bearing plotting features of the software you will need to add your KrakenSDR as a 'Remote SDR'. + +1. To do this, click on the `+` icon next to the 'Remote SDRs' text and select 'Remote Kraken'.  -Enter the serial number of the KrakenSDR (don't forget the space), give it an easy to remember name (perhaps based on location), and enter a default frequency. +2. Enter the serial number of the KrakenSDR (don't forget the space), give it an easy to remember name (perhaps based on location), enter a default frequency, and the heatmap decay time you want (we recommend a default of 60 seconds). -The decay time setting defines how long data from this KrakenSDR will contribute to the heatmap. Generally this could be anywhere from 10 to 120 seconds. Larger decay times result in more averaging over the grid space, and are useful if locating fixed stationary transmitters. Lower decay times result in more noise, but are required for moving transmitters. If your KrakenSDR is on a moving platform like a car, unless the TX is moving quickly, you probably want to set the decay time much larger (for example 30-60 minutes / 1800-3600 seconds), as then you do not want to lose the older data from points collected over time. +The decay time setting defines how long data from this KrakenSDR will contribute to the heatmap. Generally, this could be anywhere from 10 to 120 seconds. Larger decay times result in more averaging over the grid space, and are useful if locating fixed stationary transmitters. Lower decay times result in more noise, but are required for moving transmitters. If your KrakenSDR is on a moving platform like a car, unless the TX is moving quickly, you probably want to set the decay time much larger (for example 30-60 minutes / 1800-3600 seconds), as then you do not want to lose the older data from points collected over time. -Once you have the details entered, click `Create Station`. +3. Once you have the details entered, click `Create Station`. 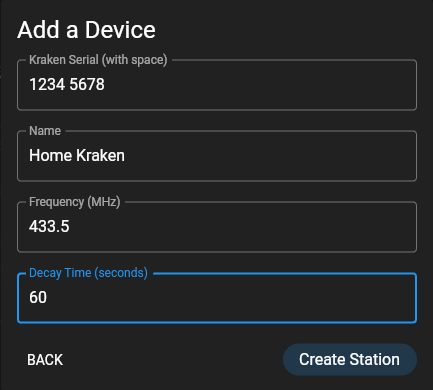 -You should now see the station added on the left sidebar. Click the gear icon next to the newly added station. +4. You should now see the station added on the left sidebar. Click the gear icon next to the newly added station. + +5. Under the device settings heading you should see an `APIKey`. Copy this value and store it for the next section. + + -Under the device settings heading you should see an `APIKey`. Copy this value and store it for the next section. +### Add the API Key to your Local KrakenSDR Software -Repeat these steps for as many KrakenSDRs as you are setting up. (During the alpha you are restricted to three maximum KrakenSDRs on the map) +Next, you will need to set up your local KrakenSDR software via its Web GUI. -### Setup your Local KrakenSDR Software +1. First connect to the KrakenSDR's web GUI via its local IP address. -Next you will need to set up your local KrakenSDR software via it's Web GUI. +2. Under the `Station Information` settings box, enter a Station ID name and change the DOA Data Format to `Kraken Pro Remote`. -First connect to the KrakenSDR's web GUI via it's local IP address. +3. In `Kraken Pro Key`, paste in the `APIKey` that you got from the mapper in the previous section. -Under the `Station Information` settings box, enter a Station ID name and change the DOA Data Format to `Kraken Pro Remote`. +4. Change location source to `Static` and enter the Latitude, Longitude and Heading of the antenna array. -In `Kraken Pro Key`, paste in the `APIKey` that you got from the mapper in the previous section. +5. The settings should automatically apply and auto save. -Change location source to `Static` and enter the Latitude, Longitude and Heading of the antenna array. +6. Repeat the above "Create a Remote SDR Station" and "Add the API Key to your Local KrakenSDR Software" steps for as many KrakenSDRs as you are setting up. (Currently you are restricted to a maximum of three KrakenSDRs). -Now click the `Save Configuration` button at the top. +### Creating a Group -At this stage you now need to reboot your KrakenSDR. +Next, you will want to group your KrakenSDRs. This step must be done, even if you are only going to create one group. + +The grouping feature allows you to separate KrakenSDRs into distinct groups. KrakenSDRs in each group will plot on the same heatmap. This is useful if you have KrakenSDRs spread out over a country. When triangulating, you will likely only want the KrakenSDRs local to a signal to contribute to the heatmap, as KrakenSDRs in another part of the country may point to a different transmitter. + +To create a group press the '+' button next to the 'Remote SDRs' text and click on 'Device Group'. Select a name for the grouping, and then select all the KrakenSDRs that you want in that group. ## Starting the Mapper -To start visualizing data click on the button that currently says `local data`. This will switch it to the `remote data` mode. -After a few minutes you should see the DOA lobe and bearing lines on the map. +A few seconds after entering the API key into the KrakenSDR web GUI as explained in the previous section, you should notice that the KrakenSDR on the cloud mapper turns green. -## Options and Features +Once all your KrakenSDR's are green you can now start visualizing data by clicking on the "Start" button. -### Main configure button (top right gear icon) +After a few seconds, you should see the DOA lobe and bearing lines on the map. The heatmap should show up a few seconds later. -**Heatmap Size:** Total size from edge to edge in kilometers of the heatmap grid. Set appropriately for your expected search space. +### KrakenSDR Remote Control +Each KrakenSDR can be remotely controlled individually or as a group by the cloud mapper. -**Heatmap Resolution:** Number of cells per axis on the grid. A higher value can result in more precise TX localization. But setting it too high can make offline logfile calculations too slow. Maximum resolution is currently capped at 500. +To control an individual KrakenSDR, click the gear icon next to it. You will see all the settings available in the local KrakenSDR web GUI. To make a change, simply change a parameter and click 'Save'. After a few seconds, the remote KrakenSDR should update its local settings. -It's important to note that setting a smaller heatmap size naturally results in a higher resolution grid too. For example, if you set your grid to 100km and resolution to 500, each grid cell has a size of 100,000/500 = 200 x 200 meters. +To control several KrakenSDR's in a group, click the gear icon next to the grouping's name. This is useful to synchronize multiple KrakenSDRs onto the same frequency. -Now if you set the grid size to 10km, each cell has a size of 20 x 20 meters. +### Granting Other Users Control -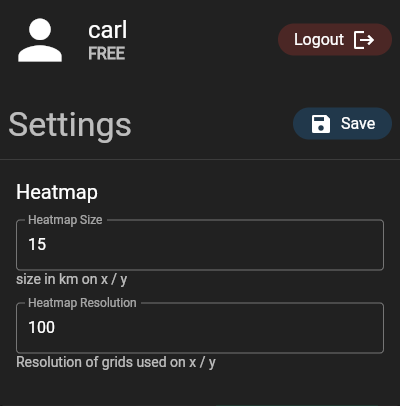 +You can add authenticated users to your groups, or individual KrakenSDRs with either WATCH or FULL permissions. Any authenticated user with FULL permissions will be allowed to control your KrakenSDR settings. Any authenticated user with WATCH permissions will be allowed to access your DoA data, but not control the KrakenSDR. -### Double Click Menu +To add an authenticated user, click the gear icon next to it, or next to a grouping. In the top right you can add the authenticated user via the email address they used to sign up to Kraken Pro Cloud. -If you double click on the map a menu will pop up. +The other user must have 'Enable Sharing' set in their Kraken Pro Cloud settings, which is also in the gear icon settings. -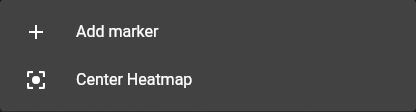 + -**Add Marker:** Adds a reference marker on the map. Useful for marking to location of known transmitters. +### KrakenSDR Multi-VFO +KrakenSDR is capable of outputting DoA data for multiple VFOs. If your KrakenSDR is set to output multiple VFOs, you can select which VFO gets displayed on the map by using the 'VFO Frequency' drop-down box. For each VFO frequency, there should be one entry in the drop-down box that can be selected. -**Center Heatmap:** Centers the heatmap grid wherever you clicked. +## History -### Layer Options -Layer options can be accessed via the layers button  on the top left. +The cloud mapper is capable of playing back data received over 24 hours. As long as your KrakenSDR is online, and has the KrakenSDR showing green in the cloud mapper, data is constantly being recorded. Currently, data is recorded for a week, anything older than a week is deleted. -This allows you to choose between a light or dark street map, or a satellite image map. +_The 24 hour playback timeframe and week long data retention may change in the future depending on how much server load this causes. Longer timeframes may become an (affordable) paid subscription feature in the future to help offset server running costs._ + +1. To access the history feature, click the rewinding clock icon  at the top, under your customer name, and then on the popup click 'Switch'. + +2. Select the grouping, or individual KrakenSDRs that you would like to be part of the playback by clicking on their names to place the blue circle around the green connected icon. + +3. Select the timeframe that you would like to playback. Currently, 24 hours is the maximum length of time that can be selected. The timezone used is your local browser timezone. + +4. Select the VFO Frequency that you would like to playback. + +5. Select the heatmap decay time. Currently, choices of 1 minute to 10 minutes are possible. -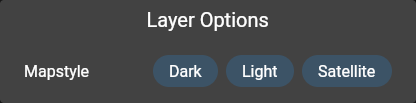 +6. Now to playback at 1x speed (1 second = 1 decay interval), press the play button. -## Loading an Offline Log Files +The timeline will display a red and green bar just above it. Red indicates that that time has no bearing data (where data was perhaps squelched). Green indicates that bearing data is available. + +If you want to playback at a faster timelapse speed, you must first precompute the heatmap data for this time frame. To do this, click on the 'Precompute Heatmap' button. This may take a few minutes to complete. Once completed, you will be able to select a playback speed of 2x, 4x or 8x. + +The gif animation below shows heatmap playback at 4x speed while the KrakenSDR was tracking the bearing towards a weather balloon. + + + +## Offline Log Files Kraken Pro Cloud can be used to visualize logs produced directly from the KrakenSDR core software created in the web GUI via the Local Data Recording feature, or for logs saved via the Android App. -To open a log file click on the folder icon under the 'Logfile' heading. Choose your .csv lolg file and click open. +1. To access the offline log files plotting menu, click on the file icon  under your customer name and then click 'Switch' on the popup. + +2. To open a log file click on the folder icon next to the 'Log Files' text. Choose your .csv log file and click open. -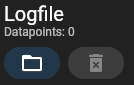 +3. If the file contains multi-VFOs, select the VFO you are interested in. -After a few moments you should see the logfile load in. The heatmap calculation may take a few moments longer if the log file is large. +4. After a few moments, you should see the logfile load in. The heatmap calculation may take a few moments longer if the log file is large. -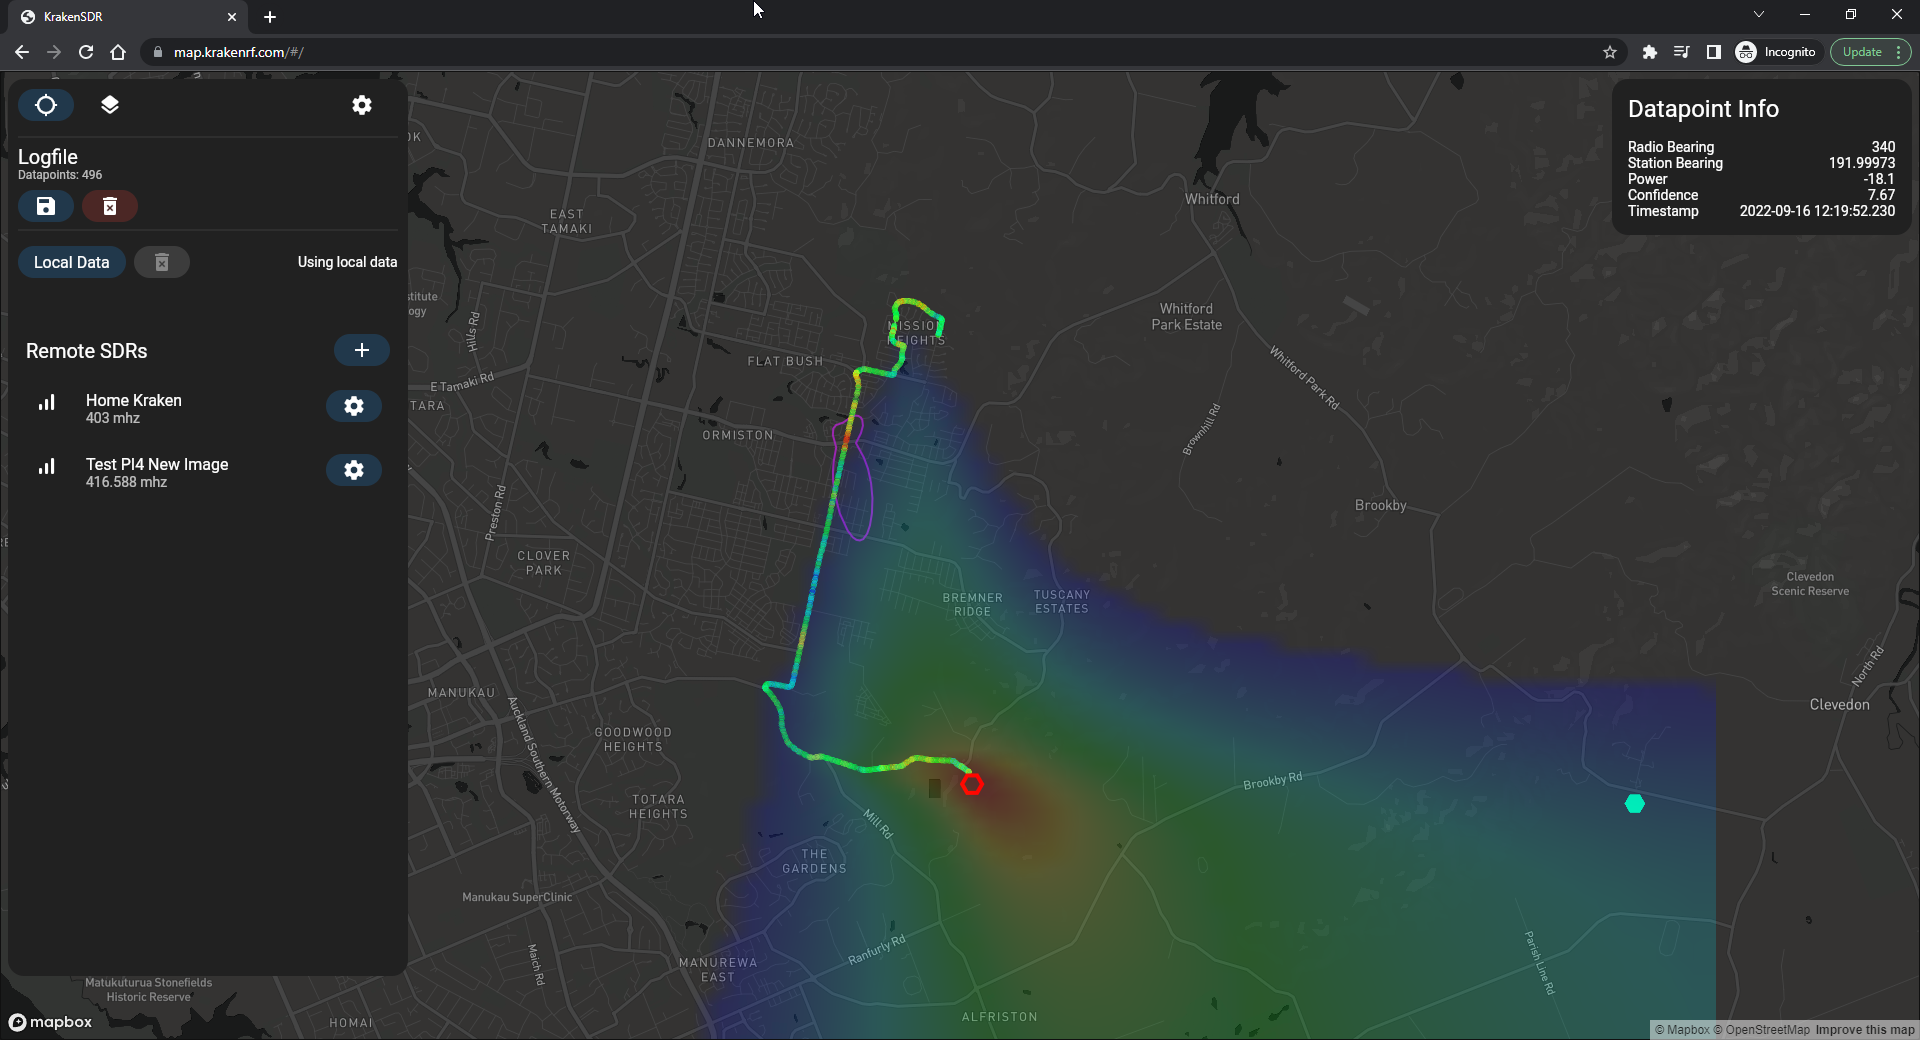 + You can click on individual data points on the map for more information about that particular point, as well as a drawing of the lobe. -## Moving Markers with Data +## Other Options and Features + +### Main configure button (blue gear icon at the top) + +**Heatmap Size:** Total size from edge to edge in kilometers of the heatmap grid. Set this appropriately for your expected search space. Too large and you will lose resolution. Too small and you may have difficulting visualizing the lobe intersections. + +**Heatmap Resolution:** Number of cells per axis on the grid. A higher value can result in more precise TX localization. But setting it too high can make calculations too slow. Maximum resolution is currently capped at 250. + +It's important to note that setting a smaller heatmap size naturally results in a higher resolution grid. For example, if you set your grid to 100km and resolution to 500, each grid cell has a size of 100,000/500 = 200 x 200 meters. + +Now if you set the grid size to 10km, each cell has a size of 20 x 20 meters. + + + +### Double Click Menu + +If you double-click on the map a menu will pop up. + + + +**Add Marker:** Adds a reference marker on the map. Useful for marking the location of known transmitters. + +**Center Heatmap:** Centers the heatmap grid wherever you click. + +**Set as Home:** Tells the mapper where on the map the mapper should default to upon load. + +**Copy Lat, Lon:** Copies to the clipboard the current latitude and longitude of the point you double clicked at. + +**Open in Google Maps:** Open the coordinates where you double clicked in Google Maps. This may be useful if you want to use street view. + +### Layer Options +Layer options can be accessed via the layers button  on the top right. + +This allows you to choose between a light or dark street map, or a satellite image map. + +## Externally Controlled Markers You can upload coordinate data to the KrakenSDR server and have it plotted as a marker on the map. This is useful for verifying a KrakenSDR setup, for example by driving around your target area with a beacon and GPS, or using a weather balloon radiosonde. -A Python script that shows an example of how to upload data to the server can be found at https://github.com/krakenrf/krakensdr_docs/blob/main/misc_scripts/sondehub_krakenmap.py. The script uses the SondeHub API to receive GPS coordinates of a weather balloon. The GPS coordinates are then forwarded to the Kraken Pro Cloud server. +A Python script that shows an example of how to upload data to the server can be found at https://github.com/krakenrf/krakensdr_docs/blob/main/misc_scripts/sondehub_krakenmap.py. The script uses the SondeHub API to receive the GPS coordinates of a weather balloon. The GPS coordinates are then forwarded to the Kraken Pro Cloud server. # Future Features -Our developer is currently working on new advanced features, some of which may require a subscription payment. These features include +Our developer is currently working on new advanced features, some of which may require a subscription payment. These features include: -- Long Term History: The ability to rewind in time and see where the bearings where crossing at some time in the past. Useful for analyzing moving objects. - Object Tracking: The ability to automatically track an object. -- Multi-VFO Layering: The ability to receive data from multiple VFOs or frequencies at once, or via the KrakenSDR sweeping. With layering options to choose frequencies to display on the map. - More than three KrakenSDRs -- Beacon ID: The ability to track KrakenSDR beacons that may be transmitting unique IDs but on the same frequency. - -DOCS IN DEVELOPMENT
\ No newline at end of file +- Beacon ID: The ability to track KrakenSDR beacons that may be transmitting unique IDs but on the same frequency.
\ No newline at end of file diff --git a/12.-Appendix.md b/12.-Appendix.md index 85dc08f..135c798 100644 --- a/12.-Appendix.md +++ b/12.-Appendix.md @@ -35,6 +35,25 @@ network={ ``` Then Press “CTRL+X”, “Y” to close and save the file. Now when you reboot the Pi 4 should automatically connect to your network. +On the Pi 5 simply use the network manager GUI in the desktop OS to change WiFi credential information. + +## Editing the Mobile Hotspot Connection Credentials +On the Pi 4 image, to change the details of the mobile hotspot that the KrakenSDR will automatically connect to, edit wpa_supplicant.conf + +`sudo nano /etc/wpa_supplicant/wpa_supplicant.conf` + +change the SSID and psk password of the "KrakenAndroid" entry to your preferred credentials. + +On the Orange Pi 5 and Raspberry Pi 5, simply use the built-in network manager GUI as part of the OS. + +## Editing the Default Raspberry Pi 4 Hotspot Credentials + +``` +cd Autohotspot +sudo ./autohotspot-setup.sh +``` +Select option 7 and follow the instructions. + ## Port Forwarding If you wish to make your KrakenSDR remotely accessible over the internet you will need to set your router to forward ports 8080 for the web interface, and port 8081 for the data output for external apps. @@ -113,4 +132,47 @@ If you expect the Web GUI to be open and want the KrakenSDR Web GUI to automatic ## Not Working * Tinkerboard - Unfortunately pure 32-bit ARM CPUs are not supported by Miniforge Conda. -# Frequently asked Questions (FAQ)
\ No newline at end of file +# Making Kraken Autoboot +If you manually install the software you can use the same procedure that we use on our image files to make the software autoboot. Make sure to change any home directory paths appropriately for your own system. + +Create a start_kraken.sh script in /boot: + +``` +#!/bin/bash + +# This script is run on startup by a systemd service at /lib/systemd/system/krakensdr.service + +cd /home/krakenrf/krakensdr_doa +./kraken_doa_start.sh +``` + +Create a systemd service called krakensdr.service in `/lib/systemd/system/krakensdr.service`: + +``` +[Unit] +Description=Start KrakenSDR Code +After=multi-user.target + +[Service] +Type=forking +Workingdirectory=/home/krakenrf/krakensdr_doa +ExecStart=/usr/bin/sh /boot/start_kraken.sh + +[Install] +WantedBy=multi-user.target +``` + +Make the service boot on every restart: + +``` +sudo systemctl daemon-reload +sudo systemctl enable krakensdr.service +``` + +Finally, in kraken_doa_start.sh, comment out the eval line, and uncomment the source line: + +``` +source /home/krakenrf/miniforge3/etc/profile.d/conda.sh #<- required for systemd auto startup +#eval "$(conda shell.bash hook)" +conda activate kraken +```
\ No newline at end of file |