
diff options
| author | krakenrf <78108016+krakenrf@users.noreply.github.com> | 2022-05-29 10:10:18 +0200 |
|---|---|---|
| committer | krakenrf <78108016+krakenrf@users.noreply.github.com> | 2022-05-29 10:10:18 +0200 |
| commit | 08daef3b5a101a2f49703c80f089db92970b9c9d (patch) | |
| tree | 1bd0cbe56ddef45cc0d08287731712fe17ff3aed | |
| parent | Initial Home page (diff) | |
| download | krakensdr_docs.wiki-08daef3b5a101a2f49703c80f089db92970b9c9d.tar krakensdr_docs.wiki-08daef3b5a101a2f49703c80f089db92970b9c9d.tar.gz krakensdr_docs.wiki-08daef3b5a101a2f49703c80f089db92970b9c9d.tar.bz2 krakensdr_docs.wiki-08daef3b5a101a2f49703c80f089db92970b9c9d.tar.lz krakensdr_docs.wiki-08daef3b5a101a2f49703c80f089db92970b9c9d.tar.xz krakensdr_docs.wiki-08daef3b5a101a2f49703c80f089db92970b9c9d.tar.zst krakensdr_docs.wiki-08daef3b5a101a2f49703c80f089db92970b9c9d.zip | |
| -rw-r--r-- | 1.-Direction-Finding-Quickstart-Guide.md | 96 |
1 files changed, 96 insertions, 0 deletions
diff --git a/1.-Direction-Finding-Quickstart-Guide.md b/1.-Direction-Finding-Quickstart-Guide.md new file mode 100644 index 0000000..a640858 --- /dev/null +++ b/1.-Direction-Finding-Quickstart-Guide.md @@ -0,0 +1,96 @@ +This QuickStart guide aims to have you connected to the Android Direction Finding App as quickly as possible with the KrakenSDR running on a Raspberry Pi 4. However, please make sure you read the rest of the manual to understand how radio direction finding works. + +This guide assumes that you have a KrakenSDR, Raspberry Pi 4, antenna array and power supplies. It assumes that you will be mounting your antenna array on a vehicle for direction finding. + +The following graphic is an overview of the entire system. + +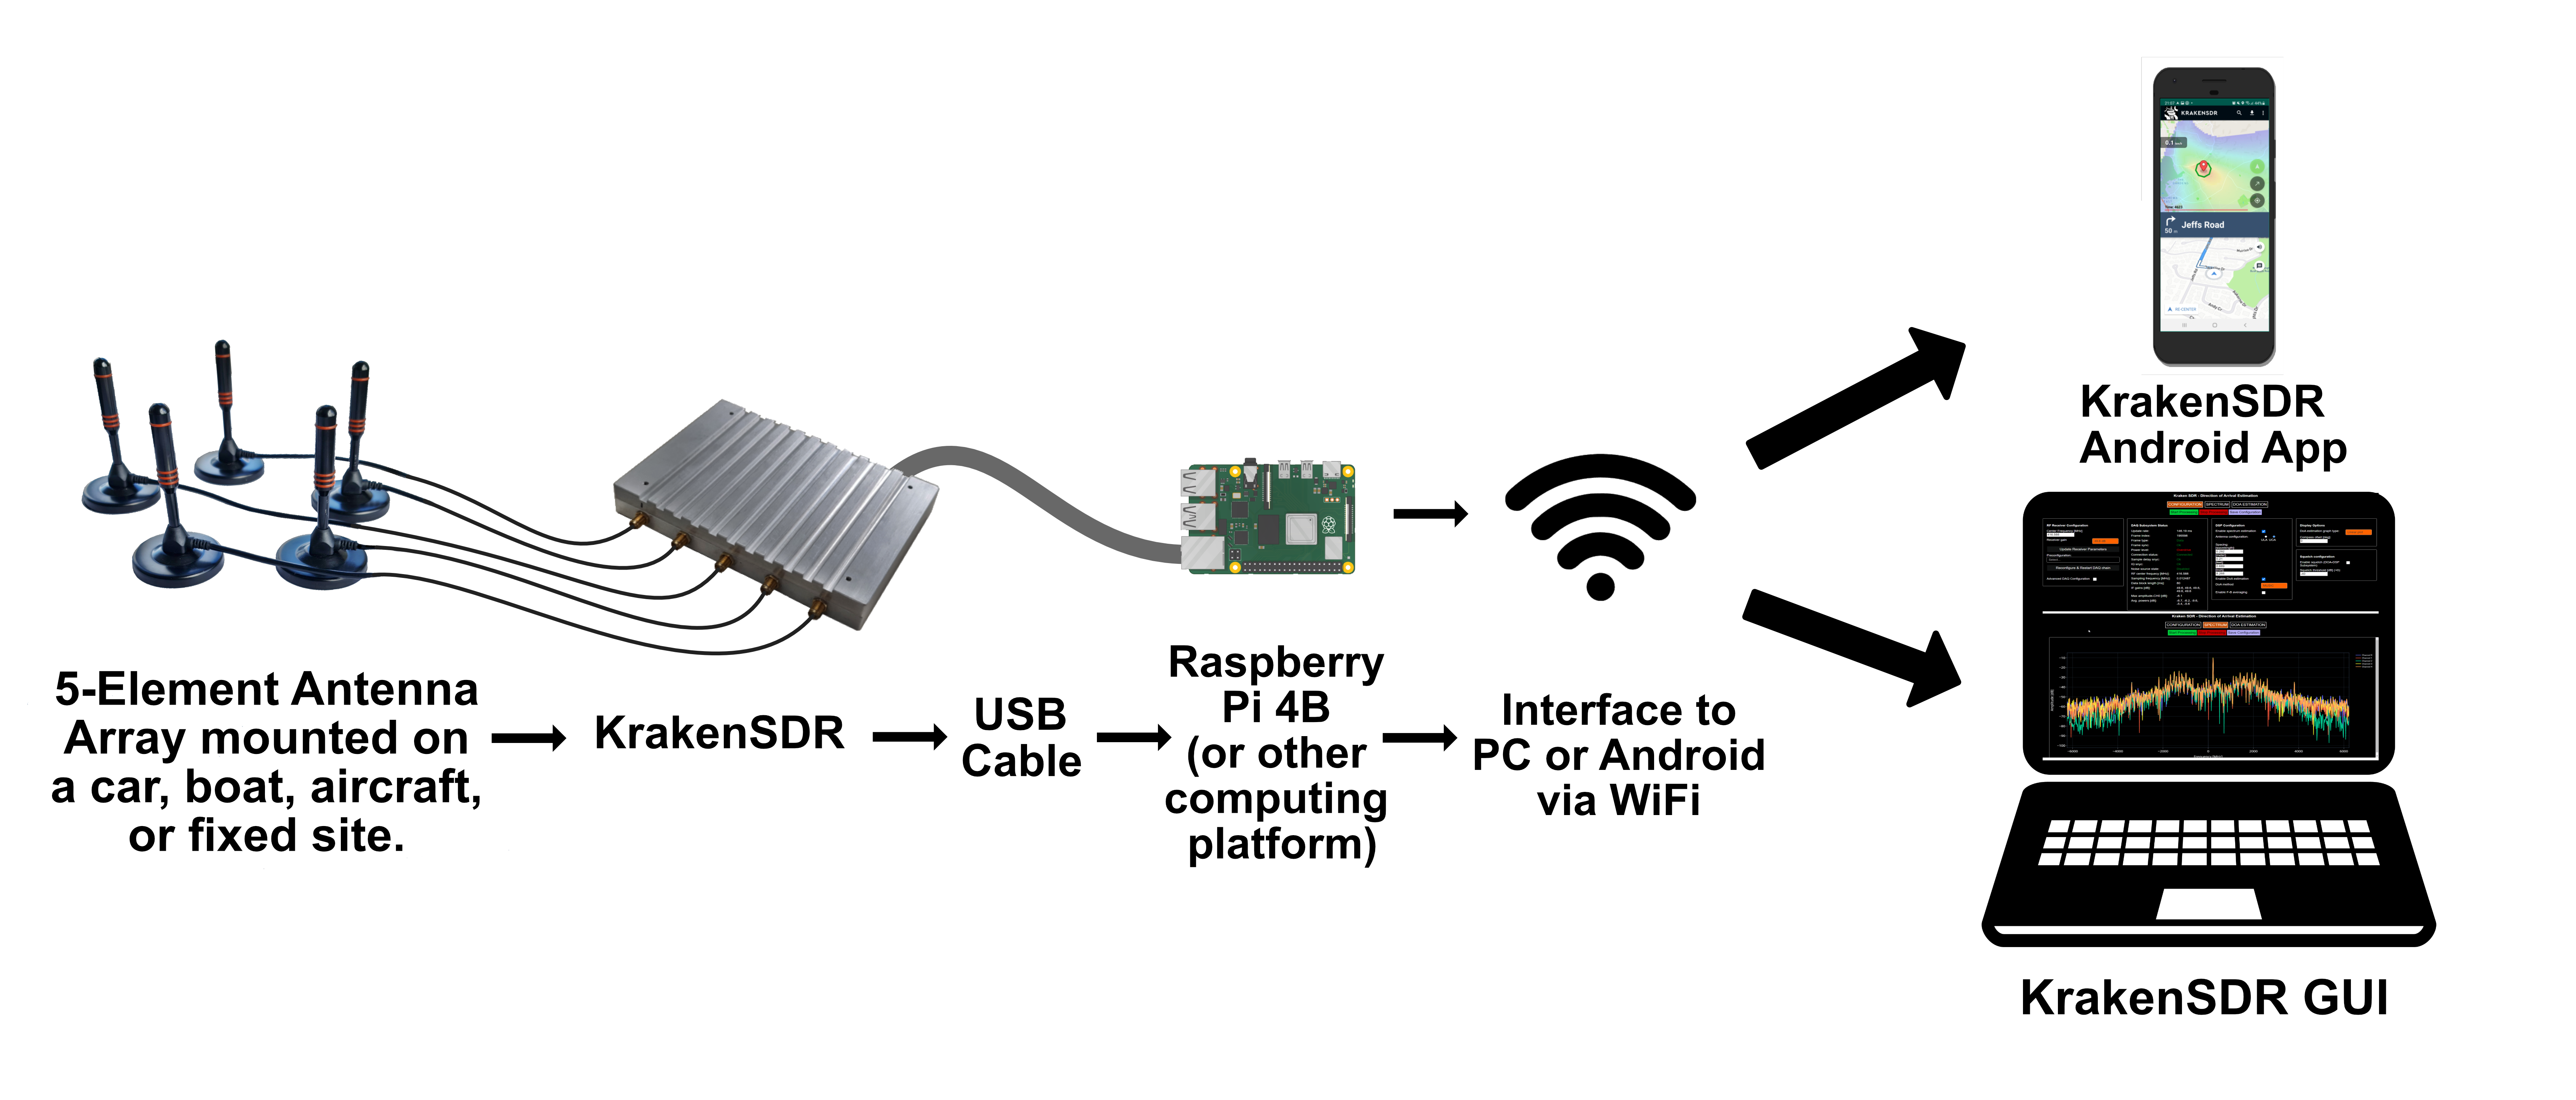 + +# Setup Antenna Array +We recommend only using a Uniform Circular Antenna (UCA) array unless you are more experienced. + +**Quick Antenna Sanity Check:** Antenna hardware must be identical. Antenna cables must be of identical lengths and construction. + +## Print Array Spacer + +The antenna array must be sized correctly for your desired frequency. It is also recommended that you use an array spacer to precisely position your antennas. + +If you have a 3D printer you can use our .obj files for the individual arms and center pentagon that can be glued together. + +Array Arm: https://drive.google.com/file/d/1LsiqZolMU4og2NStPewQWhIh3z6N1zb5/view?usp=sharing +Array Middle Pentagon: https://drive.google.com/file/d/1fn4KO7orITNJWV99XJHYu8RlZgmTl6-5/view?usp=sharing + +If you don't have a 3D printer our paper template can be used and glued together as well. + +Array Arms: https://drive.google.com/file/d/16tjBljRIHRUfqSs5Vb5xsypVTtHK_vDl/view?usp=sharing +Array Middle Pentagon: https://drive.google.com/file/d/1ekBcr3fQEz1d8WlKEerOmj-JriCywHhg/view?usp=sharing + +**Each hole is spaced at 50mm radius intervals.** So you have radius spacings of 100mm, 150mm, 200mm, and 250mm. + +## Choose a correct radius for your frequency of interest +The array radius required will depend on the frequency range that you are interested in. Choose a multiple of 50mm close to your determined radius and enter it into the "Acceptable Frequency Range For a Fixed Array Radius". Ensure that the frequency you are interested in is within the green range. + +For example in the image below we have selected a 25cm/250mm array radius. The Excel calculator shows us that we can use frequencies between ~200 MHz - 500 MHz with this size. + +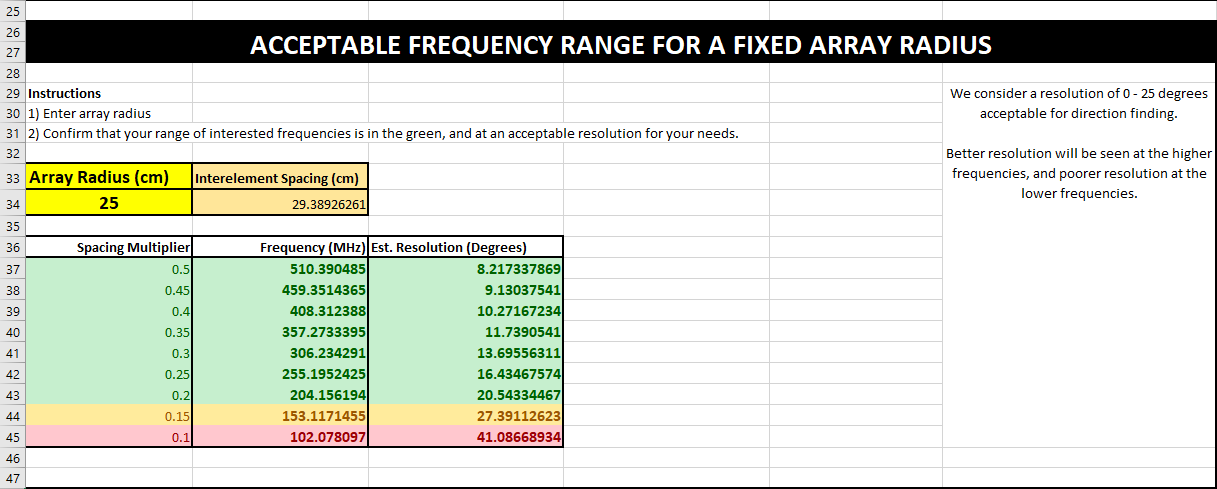 + +## Mount the antennas +The image below explains how the antennas should be mounted. Make sure the array is as straight as possible. ANT-0 must connect to CH-0 on the KrakenSDR. ANT-1 must connect to CH-1 and so on. + +<p align="center"> +<img src="https://user-images.githubusercontent.com/78108016/170187074-087d166e-ea8e-40b7-b53f-591730c72df5.png" width="1000" align="center"/> +</p> + +# Burn SD Card Image + +The next step is to burn the KrakenSDR Direction Finding (DF) image to an SD Card. You will need an 8GB or larger card, and we recommend using class 10 or faster to ensure no file system slowdowns. + +1. Using a PC, download the “Etcher” software from [balena.io/etcher](https://www.balena.io/etcher/). +2. Download the latest KrakenSDR image zip file from the [Releases page](https://github.com/krakenrf/krakensdr_doa/releases) in this repository, or via the links in the repository README. +3. Use [Balena Etcher](https://www.balena.io/etcher/) to burn the image onto the SD Card. Using Etcher you can burn directly from the ZIP file. +4. Insert the card into your Raspberry Pi 4. + +# Connect to Mobile Hotspot + +The next steps show how to run the software and get connected to the Android app. + +1. Create a WiFi hotspot on your Android device with username and password credentials KrakenAndroid/KrakenAndroid. + +<p align="center"> +<img src="https://user-images.githubusercontent.com/78108016/170163359-40238542-13db-4ac5-99bc-17de75235591.jpg" width="300"> +</p> + +2. Plug the KrakenSDR power port into a 5V/2.4A+ capable supply and plug the data port into the Raspberry Pi 4. +3. Boot up the Raspberry Pi 4 with the KrakenSDR Direction Finding SD card image installed. Keep your phone within WiFi range of the Pi 4. Once booted, if the KrakenSDR hotspot is detected by the Pi 4, it will automatically connect to the hotspot. You should be able to see the device with hostname 'krakensdr' show up under 'Connected devices' once connected. +4. Using the 'Details' button in Mobile Hotspot (or the equivalent for your particular phone), determine the IP address of the connected Raspberry Pi 4. + +<p align="center"> +<img src="https://user-images.githubusercontent.com/78108016/170163391-598f00cd-4536-4a42-a694-5eb5ed0a160f.jpg" width="300"> +</p> + +### Start and Control the KrakenSDR + +1. Open a browser and connect to IP_ADDR:8080, replacing IP_ADDR with the IP Address of the Pi 4 server. You should see the Web GUI load. If it doesn't load, wait another 1-2 minutes in case the Pi 4 system is still booting. +2. Start the KrakenSDR by pressing the green ‘Start’ button. Ensure that the Connection Status, Sample Delay Sync and IQ Sync indicators all turn green after a few seconds, and that the Frame Index is increasing. +3. Set the desired center frequency, gain, antenna array radius configuration, and other settings like VFO bandwidth and squelch for the specific signal of interest. Make sure to apply the update by clicking on “Update Receiver Parameters” after changing the centre frequency or gain settings. +4. Check the Spectrum screen to ensure that your signal is being received as expected. + +## Alternative: Connect to Offline Pi 4 Hotspot + +Alternatively, if you do not want to create a mobile WiFi hotspot with your phone (no data plan, no mobile reception etc) you can use the hotspot created by the Pi 4. But there will be no internet connection: + +1. Plug in your KrakenSDR power port to a 5V 2.4A capable supply and plug the data port into the Raspberry Pi 4. +2. Boot up the Raspberry Pi 4 with the KrakenSDR Direction Finding SD card image. The Pi 4 will create its own WiFi hotspot if it does not find any external hotspot it can connect to. +3. Open the KrakenSDR Android app, and use the download offline maps feature to download the maps for the region that you will be working in. +4. Connect to the KrakenSDR Wi-Fi hotspot on your Android device, with credentials krakensdr/krakensdr. +5. The IP address of the Hotspot is fixed at 192.168.50.5 +6. Enter the 192.168.50.5 in the KrakenSDR Android App settings. +7. You can now continue from "Start and Control the KrakenSDR" in the previous section. + +# Use the Android App + +1. Open the KrakenSDR Android app and enter the IP Address of the Pi 4 server in the settings. +2. Create a log file by pressing on the save button. +3. Press the Start DOA button to begin logging data and generating the heatmap. The start DOA button looks like a diagonal arrow and is in the bottom right of the screen. +4. Drive around to collect bearing data from multiple locations in order to triangulate the source. +5. You can use the built-in navigation feature in the Android App, or by having your navigator direct you so that you move in the direction of the plotted bearing.
\ No newline at end of file |