1
2
3
4
5
6
7
8
9
10
11
12
13
14
15
16
17
18
19
20
21
22
23
24
25
26
27
28
29
30
31
32
33
34
35
36
37
38
39
40
41
42
43
44
45
46
47
48
49
50
51
52
53
54
55
56
57
58
59
60
61
62
63
64
65
66
67
68
69
70
71
72
73
74
75
76
77
78
79
80
81
82
83
84
85
86
87
88
89
90
91
92
93
94
95
96
97
98
99
100
101
102
103
104
105
106
107
108
109
110
|
## Using KerberosSDR with KrakenSDR Software
#### KerberosSDR BOOTING NOTE
(We note that the following problem may be actually fixed with the latest Pi 4 Firmware, but will leave this information here in case people continue to experience this issue). The Pi 4 hardware has a problem where it will not boot if a powered USB hub drawing current from the Pi 4 is plugged in. Inside the KerberosSDR is a powered USB hub and hence the Pi 4 will not boot if the KerberosSDR is plugged in. So please plug the KerberosSDR in after booting. For the KrakenSDR the hardware implementation forces external power only, so this problem does not occur.
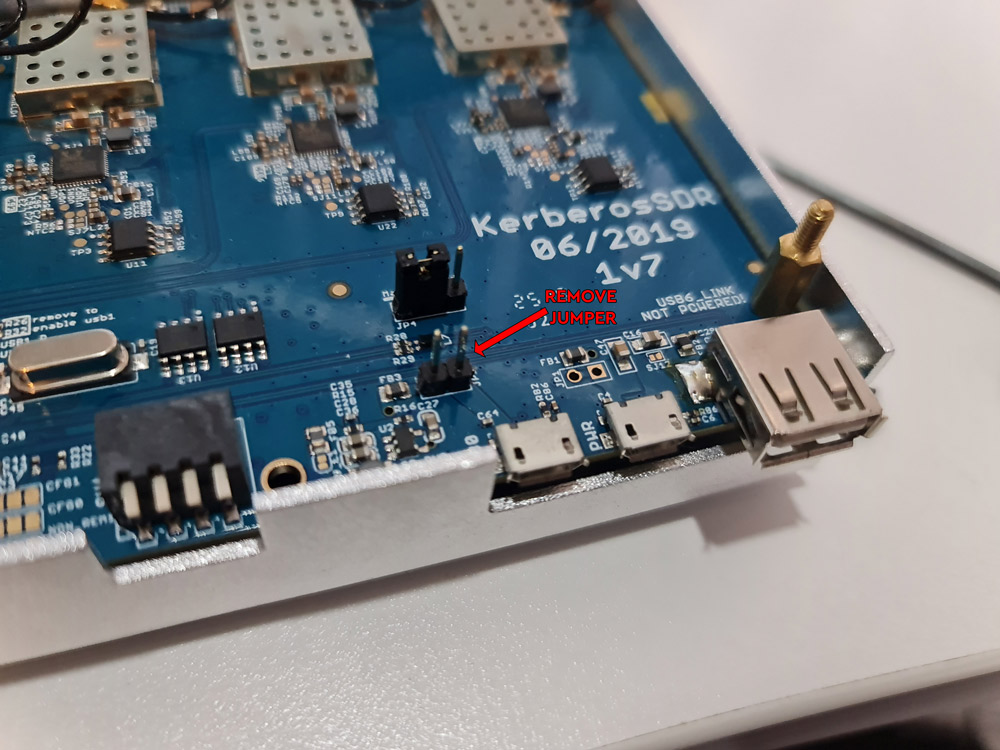
We strongly recommend making a small modification by removing a jumper on the KerberosSDR PCB to avoid this Pi 4 issue. This modification force external power only on the KerberosSDR by opening the enclosure, carefully removing the top calibration board, and then removing the `JP2` jumper from the PCB.
#### KerberosSDR EEPROM Update
For KerberosSDR users you will need to initially flash the EEPROM to use the new serial numbering scheme. Connect a monitor and boot up the image file. The code will not start as the EEPROMs are incorrect.
There is a script in `~/krakensdr_doa/heimdall_daq_fw/util/eeprom_init.sh` that can guide your through this. Just plug in your KerberosSDR (ensuring it is powered from the power port), and run the script `./eeprom_init.sh`. The script will guide you to use the DIP switches to turn all units off, except the currently requested tuner. It will then flash the realtek_oem firmware, then the serial number, before asking you to turn off that tuner, and turn on the next one. Answer `Y` each time it asks to flash.
Once the EEPROM is flashed you can reboot and follow the reconfiguration step below.
#### KerberosSDR Reconfiguration
The image is currently set up for the KrakenSDR. For KerberosSDR users, please update the EEPROM as described above first, then reboot. Once the web interface has loaded, expand the "Basic DAQ Settings" by clicking on the checkbox. Under "Preconfigured DAQ Files" select "kerberosSDR_default", and then click on "Reconfigure and Restart DAQ chain". This may take a minute or so, but after it's completed the software should connect and begin processing.
#### KerberosSDR Retuning
The KrakenSDR code is designed to autocalibrate phase on each retune. Unfortunately this feature is not available on the KerberosSDR due to the lack of a noise source switching circuit. So with the KerberosSDR every time you change the frequency or DAQ settings, you must make sure that you have the antennas disconnected.
Also if you make any custom changes to the DAQ settings (which is not recommended), always ensure that `Calibration Track Mode` is set to `No Tracking` otherwise the software will attempt to recalibrate every X-minutes.
Once you've set the center frequency, you can connect your antennas. In the Spectrum screen you can use 'click to tune' to tune to any frequency within the active bandwidth without needing to recalibrate.
## Enclosure Drawing

## Connecting to an Established WiFi Network
If you are using either the Kraken DF or Kraken PR pre-made images on a fixed WiFi network, instead of using hotspots, then you will need to add your WiFi network details. To do so you will need to temporarily connect your Pi 4 to a monitor and keyboard or connect your Pi 4 using Ethernet and SSH into it.
The default login credentials for the terminal and SSH are krakenrf/krakensdr, port 22.
To add your network, edit the file: wpa_supplicant.conf
`sudo nano /etc/wpa_supplicant/wpa_supplicant.conf`
Add your own network by adding the following text
```
network={
ssid="MY_WIFI_SSID"
psk="MY_WIFI_PASSWORD"
}
```
Then Press “CTRL+X”, “Y” to close and save the file. Now when you reboot the Pi 4 should automatically connect to your network.
## Port Forwarding
If you wish to make your KrakenSDR remotely accessible over the internet you will need to set your router to forward ports 8080 for the web interface, and port 8081 for the data output for external apps.
Instead of port forwarding, you may wish to investigate more modern VPN solutions like [Zerotier](https://www.zerotier.com/).
## Port Security
Be aware that if you expose port 8080 to the internet, then your KrakenSDR will be open to being controlled publicly by anyone with your IP address. Therefore, we do not recommend power forwarding port 8080 unless you have a specific purpose for doing so. In future software enhancements we will be adding a security option for this page.
If you plan on also exposing post 22 so that you can SSH into the device remotely, then we strongly recommend changing the SSH password from “krakensdr” to a custom password.
Again, instead of port forwarding, you could use something modern like Zerotier and avoid these security issues.
## Data Output For Third Party Software
When set to the 'Kraken App' DOA Data Format the latest bearing data will be output to an HTML page at "http://PI4_IP_ADDR:8081/DOA_value.html" in the CSV format every update period.
The output format CSV ordering is as follows:
```
1. UNIX Epoch Time : (13 Digit LONG),
2. Max DOA Angle in Degrees in Compass Convention : (3 Digit 000 - 359, 90deg East),
3. Confidence Value : (0-99 float, higher indicates a better quality reading),
4. RSSI Power in dB : (0 dB is max power),
5. Channel Frequency in Hz,
6. Antenna Array Arrangement : ("UCA"/"ULA"/"Custom"),
7. Latency in ms : (Time from signal arrival at antenna, to result. NOT including network latency.),
8. Station ID : (Name of the KrakenSDR station inputted in the Station Information box in the Web GUI),
9. Latitude,
10. Longitude,
11. Heading,
12. Heading Sensor Used ("GPS"/"Compass"),
13-16. Reserved for possible future use,
17-377. Full 360 degrees DOA output. First element specifies DOA power output at 0 degrees, second element power at 1 degrees etc. NOTE: Uses unit circle convention, so due EAST is classed as 0 degrees, NORTH 90 degrees and so on. Needs to be rotated into compass convention.
```
If multiple VFO channels are used, each channel will output it's own unique CSV data from 1-377 separated by a newline character "\n".
## Changing Settings Programmatically
In the `~/krakensdr_doa/krakensdr_doa` folder there is a file called `settings.json` where the current settings in the Web GUI are stored, including settings like the center frequency and gain.
An external piece of software can edit this file, and the software will automatically update it's settings to those specified once the file is changed.
It is up to you the programmer to ensure that the inputs are valid. Entering incorrect values may crash the software.
# Tested Devices
## Working
* Raspberry Pi 4
* Intel i5, i7 on Ubuntu
* Dell Wyse Thin Clients
### Virtualization
* Virtual Box Ubuntu VM
* Docker with ClearLinux
## Problematic but with workarounds
* Odroid N2/+ - The official Odroid Ubuntu Mate Distro doesn't work. USB is too buggy with the internal KrakenSDR USB Hub and it keeps dropping the tuners. Armbian Odroid appears to work. BUT, you must use the BOTTOM USB port that is closest to the DC power barrel jack. All other USB ports do not work.
## Not Working
* Tinkerboard - Unfortunately pure 32-bit CPUs are not supported by Miniforge Conda.
# Frequently asked Questions (FAQ)
|
